

Japan maybe is the most desired country for most visitors, I bet everyone know why, from temples, shrines, the scenic views, the streets, Ninja, Anime up to the discipline of Japanese people. Indeed Japan has to lot to offer.
For us it is a dream destination, a dream that actually came true earlier than we expected and plan it to be. Although we have a lot of dream travel destinations that we keep on chasing one by one, Japan stands out. So, when we stumble upon a seat sale that is affordable for us, we never think twice and booked it immediately.
So here are DIY travel tips that we can share for your easy and budget friendly Japan travel. Our Japan travel is purely DIY, we did not booked anything in advance like tours, train tickets and Wi-Fi except for a hotel as this is an immigration requirement. If you follow us on Instagram you know that we always preferred DIY travels.
EXPENSES
Ticket: P 12,436.62 RT 2 pax
Visa processing: P 1,900 2pax
Travel Tax: P 3240.00 2 pax
Pocket Money: ¥ 100,000.00 (P 47,780.00) 2 pax – Exchanged through Metrobank
Total Budget for 5N4D: P 65, 356.62 (All in)
Breakdwon expenses of Pocket money ¥ 100,000.00 for 2 pax:
- Hotel accommodation for 5 nights 4 days – Booked Through Booking.com ( ¥ 19,600.00 for 2 pax (Hostel Kyoto) and ¥ 5,850.00 for 2 pax (Hotel Wing International Nagoya)
- Train tickets (Unlimited Kintetsu rail pass for 5 days ) – ¥ 7,600.00 for 2 pax)
- Pocket Wi-Fi ( ¥ 600, 1 GB per day for 5 days = ¥ 3,000.00)
- Food
- Tour Entrances
- ICOCA cards (¥ 2,000.00 per card ¥ 1500.00 useable and ¥ 500 deposit each plus ¥ 1,000.00 reload each. = ¥ 6,000.00) – Bus and Local Trains Transportation
- Souvenirs
ITINERARY
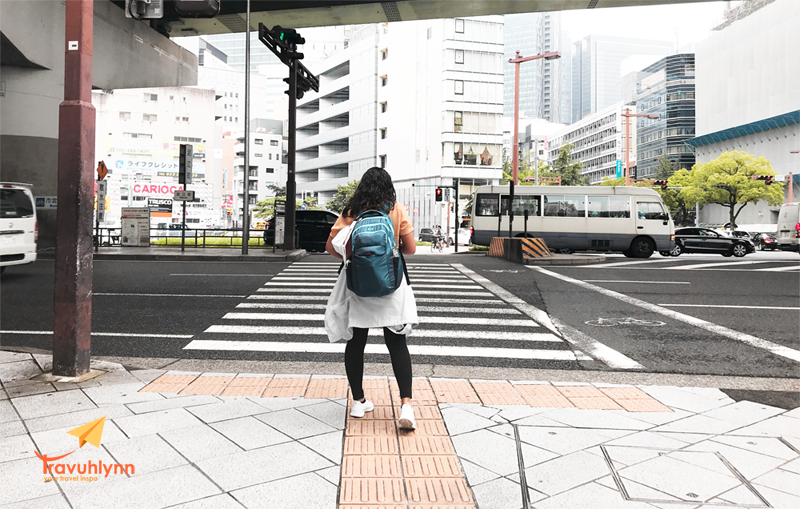
Our Arrival is at Chubu Centrair International Airport, at first we thought that we may have made a mistake booking in Nagoya since when we do our first research there’s not much of attraction in the area and travel from Nagoya to Kyoto cost a lot. This is where we are mistaken, digging further and researching more and more, we realized that this is an ideal place to start exploring Japan and it is not that expensive traveling to Kansai Region from Nagoya. We have not followed fully our original itinerary but hey, the true essence of DIY travel for us is to be flexible.
Day 0: (July 5, 2019) – Arrival
Arrived at Chubu Centrair International Airport (Nagoya) – 8:40 p.m. Rent Wifi at Global Wifi.
Travel to Nagoya Station (¥ 1,600.00 2 pax)
Walk to Hotel Wing International Nagoya and checked-in – ¥ 5,850.00 (P 2,757.00)
Eat and then rest (Bought food from 7 Eleven)
Day 1: (July 6, 2019) – Travel to Kyoto
- Eat breakfast and walk to Nagoya Station (Bought food from 7 Eleven)
- Purchased two unlimited Kintetsu rail pass for 5 days at Nagoya station – ¥ 7, 600.00 (P 3,800.00)
- Travel to Ise – Nakagawa (Travel time: Approx. 1 hour and a half)
- Stop over and eat light meal (Bought food from Family mart)
We actually intended to explore Ise-Jingu before going to Kyoto but we left Nagoya late so we have to set aside Ise.
- From Ise Nakagawa travel to Yamato-Yagi Station (Travel time: Approx. 1 hour and a half)
- From Yamato-Yagi Station travel to Kyoto Station (Travel time: Approx. 50 minutes)
- Eat light food at Kyoto station (Remaining food from Ise Nakagawa)
- Walk to Walker Hostel Kyoto
Walker Hostel Kyoto is a highly recommended hostel, the owner Leo is so accommodating and explain to us every must-visit destination in the Kyoto and how the train and buses work, it is a big help. It is also near the Temples of west Kyoto, you can actually just walk to explore these temples from the hostel. Just outside the hostel is the Sokujo-in temple but we have not visited it.

- Rest and walk to Nineizaka, Yasaka Shrine and Gion District (Entrance fee: Free)
- Eat some local dish and take home food from Family mart for dinner and breakfast for the next day.


You may say that we spent our first day just by travelling but when you are on the train and watching every village and city, riding the train is already an attraction.


Day 2: (July 7, 2019) – Arashiyama
- Walk from Hostel to Kyoto station
We opt to walk early in the morning to familiarized the area, we passed by Kamogawa river, bridges where you can see trains from underneath when they pass by, railways, Kyoto tower and the streets were amazing.


- Ride local trains to Saga – Arashiyama (Travel time: 25 minutes)
- Walk from Saga – Arahiyama Station to bamboo forest and explore
Come early in the morning before 7:00 a.m. is advisable
- Eat light snacks (Steamed pork bun and Macha ice cream sandwich is a must try)
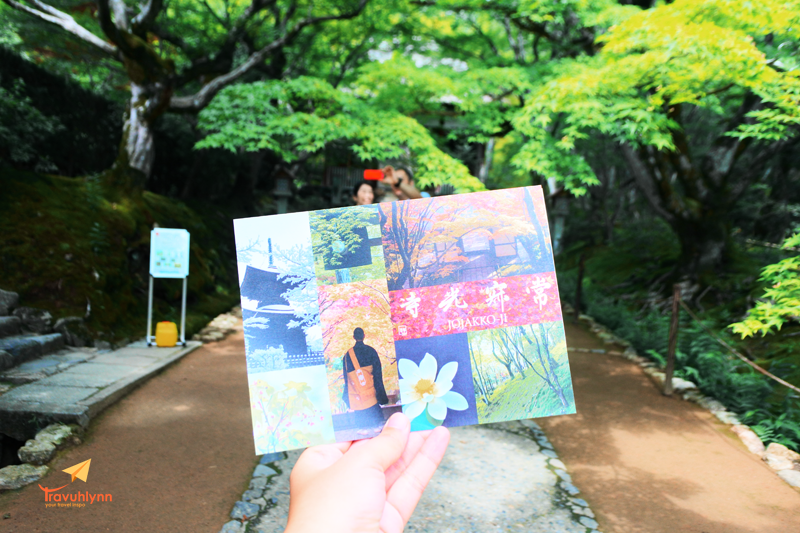
- Walk to Jojakko-Ji temple and explore – 5 minutes walk from Bamboo forest ( Entrance fee: ¥ 500 per pax)


In addition to Tenryu-JI temple, Jojakko-Ji temple is a must visit place, it is so serene, there’s a lot to explore inside plus the amazing view at the top overlooking Kyoto and not much of a tourist coming. We just happened to found this from Google Maps.
What to see inside Jojakko-Ji Temple: The old Shigure-tei site, Tahoto Pagoda, Immortal Poet Shrine, Observatory, Monk’s quarter, Myoken Bodhisattva, Main hall, Niomon Gate, Sanmon Gate)

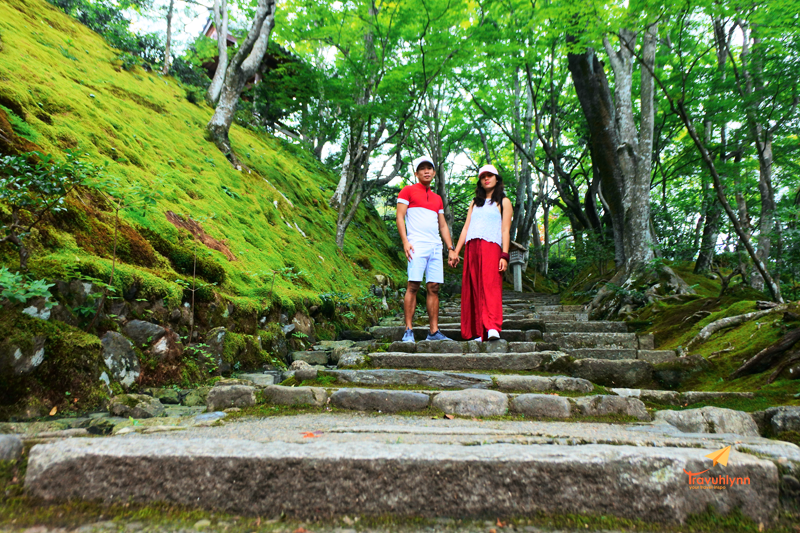

- Walk to Tenryu-ji Temple – Just outside the Bamboo forest (Entrance fee: ¥ 500.00 per person, Main hall walk: ¥ 300.00).
A must visit but unlike Jojakko-Ji, Tenryu-Ji is full of tourist but it is still a must visit, amazing structures and view. A walk to the main hall is the main attraction we stayed here for quite a while just relaxing.


Tenryū-ji, formally known as Tenryū Shiseizen-ji, is the head temple of the Tenryū-ji branch of the Rinzai sect of Zen Buddhism.
- Lunch at the local restaurant (Takoyaki, Yakisoba and Macha ice cream)
- Walk at the street of Arashiyama and bought some souvenirs
There’s a lot of shops here selling souvenirs and foods, we bought most of our souvenirs from here
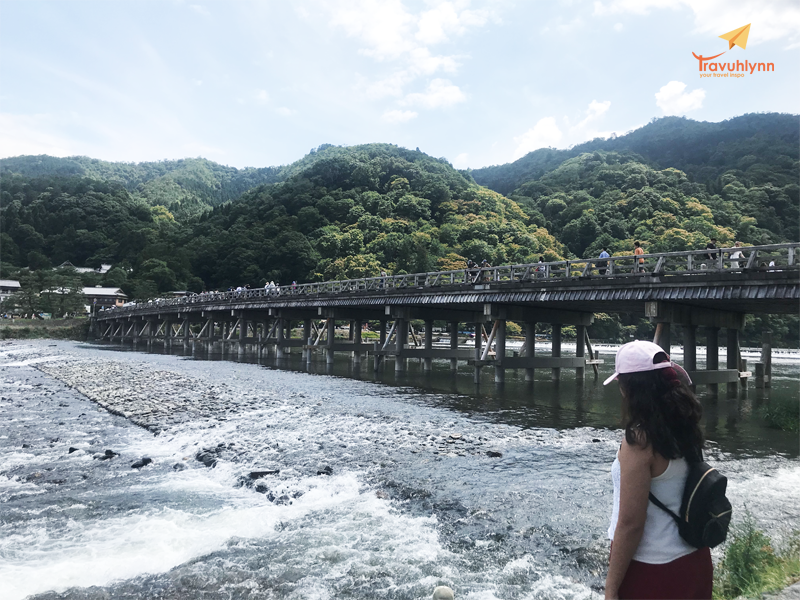
- Walk and relax at Togetsu-kyo Bridge, relax and dip in the cold water of Katsura River.
- Walk to Arahiyama Monkey Park (Entrance Fee: ¥ 550 per pax)

You must visit this place when in Arashiyama this will be a worthwhile walk and of course the monkeys. It is just a walk in the park… like Monkey Park. No photography along the way.
- Go back to hostel and rest
- Short walk to Kodaiji temple (Entrance Fee: Free)
- Eat Dinner at local Ramen and take home some food from Lawson for breakfast the next day
Day 3: (July 8, 2019) – Fushimi Inari and Temples of west Kyoto
- Walk from Hostel to Tofukuji station
- Ride train to Inari Station
- Trek Mt. Inari (Entrance fee: Free) – You should never miss this place, it is so serene here.
The trek is around two hours depending on your pace.


- Eat light meal
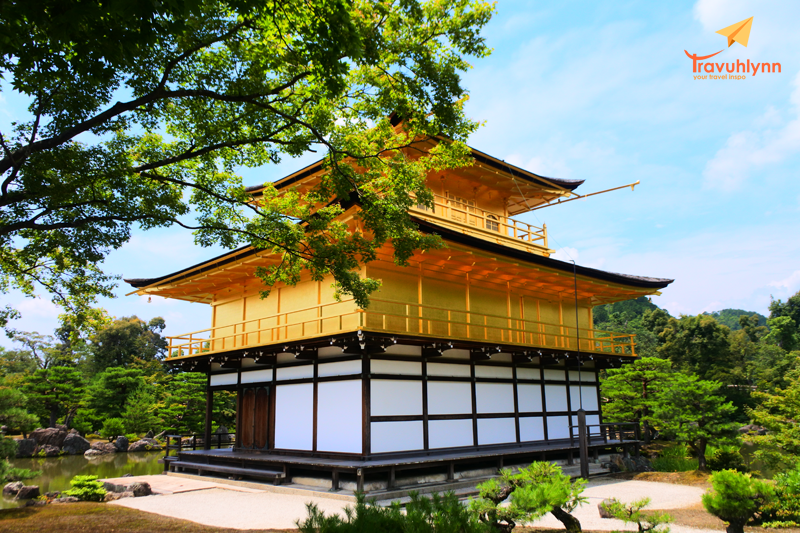
- Explore Kinkakuji Golden Pavilion (¥ 400.00) – A must visit place, it is a Zen temple, whose top two floor are completely covered in gold leaf. It is also Shogun Yoshimitsu’s former retirement complex
Ride a train from Fushimi-Inari station to Gion-Shijo Station and then ride bus number 12

- Eat light snack
- Ride bus going to Nijo Castle – We ride on a wrong bus, but most of the busses are passing Nijo castle. It just took as a while to reach Nijo castle around an hour but it give us some time to rest from the trek at Mt. Inari summit
- Explore Nijo Castle (Entrance fee: ¥ 1,000.00) – Tokugawa Shogun’s residence is a must visit place in Kyoto. Go for a walk inside the castle, super rich in history. This is where the Shogun era started and ended.
NO photography inside the castle


- Explore Kiyomizu-dera (Entrance fee: ¥ 300) – It is one of the most celebrated temples of Japan. The name derives from the fall’s pure waters. The temple was originally associated with the Hosso sect, one of the oldest schools within Japanese Buddhism. One of UNESCO’s world heritage sites. – We actually just explore the free area since we are so tired of the whole day’s walk.
Ride bus 37 from Nijo Castle to Gion and then ride bus 202 going to Kiyomizu-dera

- Eat Wagyu, pork Japanese Curry and Omu-rice from local restaurant
- Go to Kyoto station and buy souvenirs from Don Quijote, Japan.
- Return to hostel and rest
Day 4: (July 9, 2019) last day – Nara – Nagoya – Manila
- Check out from hostel
- Ride bus 207 from hostel to Kyoto station
- Travel to Yamato-Saidaiji via Kintetsu rail
- Leave baggage at the station
- Ride Kintetsu train to Nara
- Eat light snack from Nara local restaurant
- Explore Nara Park (Entrance fee: Free)

Having Fun at Nara Park 
This one is too full to move.
- Explore Todaiji temple (Entrance fee: ¥ 500) – is a must visit site in Nara. It is a Buddhist temple complex that was once one of the powerful Seven Great Temples. Have a walk inside the great Buddha hall and see the giant Buddha’s structures and crawl through the Buddha Statue’s nostril. According the legend, if you crawl through the Buddha Statue’s nostril you will be blessed with health and happiness
- Deer feeding – They are so adorable and terrifying at some point. A one of a kind experience.

They will swarm you when you hold a cookie. 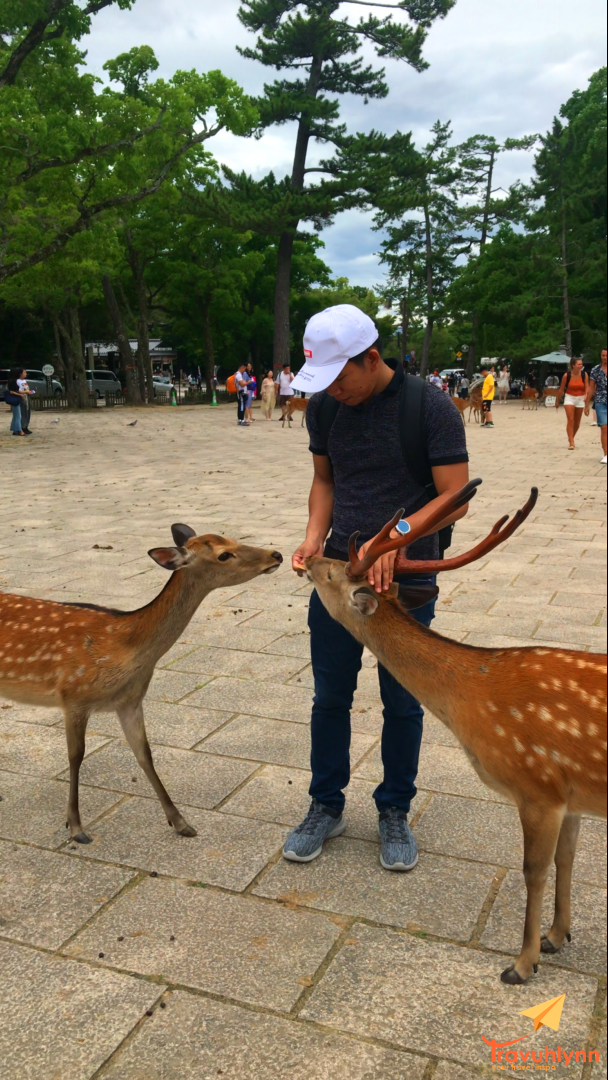
Feeding with feelings. 😀
- Lunch Udon at local Restaurant
- Travel back to Yamato-Saidaiji Station
- Travel to Yamato-Yagi station
- Purchased express ticket going to Nagoya (¥ 3,200.00 2 pax)
- Travel from Nagoya station to Airport (¥ 1,600.00 2 pax)
- Airport check-in, return Wi-Fi and Eat dinner at the airport
- Departure for Manila
Must have for Kansai region plus Nagoya Japan travel.
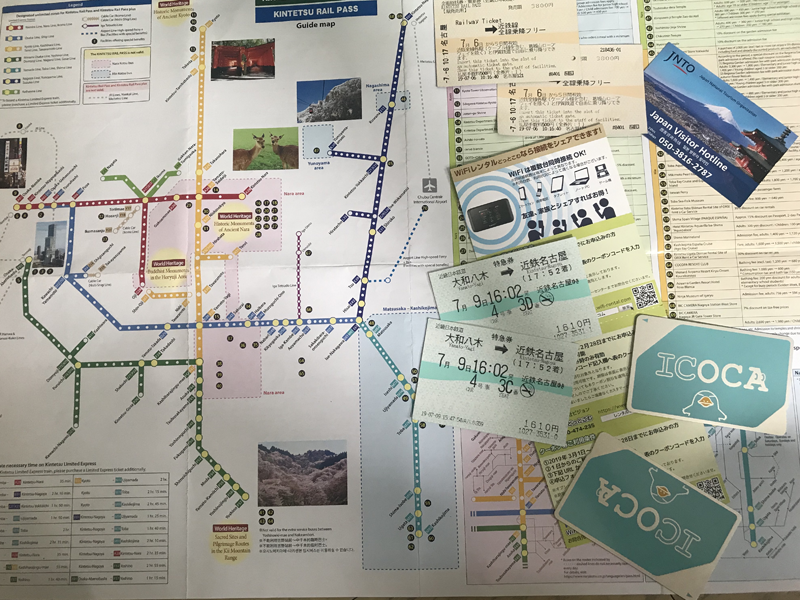
- Kintetsu Rail pass – Unlimited Kintetsu ride for ¥ 3800.00 per pax around P 1900.00 for 5 days. 1600 pesos if purchased outside Japan. A must have if you land at Nagoya or Osaka and want to travel the entire Kansai Region. You can purchase Kintetsu rail pass from Klook,Nagoya Airport, Nagoya Station, Kyoto Station and Osaka airport (please see full list here https://bit.ly/2GtCVBN ).
- ICOCA Card – for non-Kintetsu train ride ¥ 2,000.00 (¥ 1,500.00 consumable). Can be used for trains and busses.
If you will only explore Kyoto for a day no need to buy ICOCA card, you can just buy the unlimited bus ride and then purchase ticket for every train ride.
- Wi-Fi – depending on your needs, they have ¥ 600.00 for 1GB a day up to ¥ 1,500.00 I think for unlimited data. For us we purchased the 1GB data per day since we only be using this for navigation. Note that most hotels and hostels have free Wi-Fi, including airports and tourist spots.
- One day Unlimited Kyoto bus ticket ¥ 600.00 yen (P 300.00) – You will need this. Kyoto has a flat rate of ¥ 230.00. So ¥ 600.00 unlimited ride is budget friendly. Can be used within the allocated zone of the city (Arashiyama, Sagano, Takao, Shugakuin etc. are outside of the allocated zone).
- Japan Visitor hotline – You will need this in case of Emergency.
- Google Maps – just remember that Japan is always left and Google maps will provide you of a wrong bus stop. This frustrate me until I discover this.
- Trains and Busses Maps – a bit complicated at first but once you understand it, it’s easy.
Tips: if you have enough time and want an affordable city tour just ride any busses near your hotel and just drop off to any destination you see. Unlimited bus ride is useful for this.
The food from convenient stores were amazing plus it’s cheaper.
If you have any questions feel free to message us.
